Monday, 30 November 2009

Vintage Rose Red

Supplies
Tube of choice - I am using the artwork of KatNKDA which is available to purchase from NK Art Shop
Scrapkit - a beautiful ptu kit also by Kat called 'Vintage Christmas' which you can purchase here
Mask - Babes Mask 16 here
Font of choice - I am using Bickham Script Fancy
Plugins - Xero porcelain
Eye Candy gradient glow
OK - Open a new image in PSP 600x600 floodfill white
Copy & paste element 49 as a new layer, resize & sharpen
Paste a close up of your tube inside the small frame and erase any overhang outside the frame
lower the opacity on the tube layer slightly
Paste your tube again as a new layer and mirror
add drop shadow 5 5 70 9
Resize element 42, sharpen and position over the frame
copy & paste element 33, resize & sharpen and position
add a bow of choice and place at the top
Copy & paste some roses from the kit, resize & position at bottom
sharpen and drop shadow elements 0 0 50 5
Hide white background layer & merge visible all other layers
resize by 85%, sharpen and apply xero porcelain at default settings
crop your tag & unhide background
Add a new raster layer above background layer and select all
Copy Paper 9 and paste into selection, select none
Apply mask, delete & merge group
Copy element 37 and paste as a new layer above background layer, resize and sharpen
duplicate , mirror and flip and position
Add your name & apply a gradient glow using #b28b61
add any copyright information
delete background layer & save as a Png!

Saturday, 28 November 2009

Winter Wonderland

Supplies
Tube of choice - I am using the artwork of Steve Baier which may be purchased from UpYourArt
Scrapkit - a great freebie add-on kit called 'winter wonderland' from Raspberry Road Designs which you can find here - you need to register with the site to download the freebie but it is well worth it as they have some fabulous goodies!
Mask - Vix Mask 431 which you can download here
Wintery wordart also from Vix here
Thank you!
Font of choice - I am using wild ride
OK - Open a new image in psp 600x600 floodfill white
Add a new raster layer and select all
Copy Paper2 and paste into selection, select none
Apply mask, delete & merge group, add noise at uniform 45
Copy & paste the parcels, 11 & 12, resize & duplicate a few times, resizing again
position along the bottom, overlapping eachother, merge the parcels together, sharpen & drop shadow 0 0 50 5
Copy element 13, resize and sharpen and position above the parcels, duplicate & mirror
Resize element 9 and position at the top, sharpen more
paste your tube as a new layer and position so it looks like she is laying on the parcels
add a drop shadow of choice - I used 5 5 70 9
resize the ribbon 17 and place on the parcels layer, sharpen & drop shadow
copy element 7, rezize and paste as a new layer above the mask layer
resize element 19 and position above this layer, sharpen
Add the bauble (14) and the moon (21), resize and position
sharpen both elements and drop shadow 0 0 35 5
Resize the snowflake 18 sharpen & duplicate a few times, position around the tag
Add the wordart and your name
resize tag & crop to your liking
add any copyright info, delete background layer & save as a Png!

Sunday, 22 November 2009

Fantasy in red

Supplies
Tube of choice - I am using the artwork of Jose Cano which may be purchased from MPT
Scrapkit - a fabulous ptu kit from KatNKDA called 'Anne Boleyn' which you can purchase from NK Art Shop
Mask - Babes Mask 32 here
Font of choice
OK - Open a new image in PSP 600x600 floodfill white
Copy element 7 from the kit, paste as a new layer and resize by 85%
click inside frame with magic wand & expand by 6
copy & paste Paper 13 as a new layer, selections, invert, delete and drag below frame layer
select none - drop shadow frame 0 0 70 5
copy element 28, paste as a new layer, rotate 90 degrees right, sharpen
resize and position along side of frame
copy leaves 52, resize rotate and position at opposite side
duplicate and image mirror, move ito position
resize roses 50 and 51, position, sharpen & drop shadow
copy elements 36 & 37, resize both and sharpen
position on the tag and drop shadow
add your tube, drop shadow 5 5 70 11 and erase any overhang at bottom
add a new raster layer above background layer & select all
copy & paste Paper 1 into selection, select none
apply mask, delete & merge group
Copy elemnt 4, paste as a new layer above mask layer, resize and sharpen
duplicate, image mirror - merge down, duplicate, image flip
add your name & copyright info
delete background layer & save as a Png!

Saturday, 21 November 2009

Hot Stuff

Supplies
Tube of choice - I am using the gorgeous artwork of Ismael Rac which may be purchased from AMI
Scrapkit - a fab freebie from MaryPop Designs 'Winter Time' which you can find here
thank you!
Mask I am using is OMask 046 here
Font of choice - I am using Lounge Bait and Jilly Bean
OK - Open a new image 600x600 floodfill white
Add a new raster layer and select all
copy element 13 and paste into selection, select none
resize by 85%
Copy & paste element5 as a new layer, resize by 50% and duplicate
move the duplicate layer so it sits on top, merge down and sharpen
use your deform tool to turn so it is almost vertical, duplicate
on the bottom layer turn slightly to the left using deform tool
merge down
Copy element8, resize, sharpen and position
add a light drop shadow 0 0 50 5
resize element1 and position, sharpen
copy & paste element3, resize and place at top
sharpen and dropshadow as above
resize element 7, shrpen and place at side
add your tube and drop shadow 5 5 70 11
type your words of choice using the Jilly Bean font and position on tag
add a new raster layer above the background layer, select all
copy Paper 12 from the kit and paste into selection
select none and apply mask, delete and merge group
add noise to the mask layer at uniform 40
hide background layer & merge visible all other layers
resize & crop to your liking
add your name & copyright info
delete background layer & save as a Png!

Monday, 16 November 2009

Some bunny loves you

Supplies
Tube of choice -I am using the artwork of Keith Garvey which you may purchase from MPT
Scrapkit - a beautiful ptu kit from KatNKDA which is available to purhase from NK ART SHOP
Mask of choice - I am using WSL 84
Font of choice - I am using Curlz MT
OK - Open a new image in PSP 600x600 pixels floodfill white
Copy & paste Frame 01 from the kit, resize to fit and sharpen
click inside the frame with magic wand and expand by 5
Copy & paste Paper 15 as a new layer, resize, selections, invert, delete and drag below the frame layer, copy the lace element 10, position above the paper layer, resize and hit delete again, select none, sharpen the lace layer and add a drop shadow to frame 0 0 50 5
Add your tube and drop shadow, erase any overhang at bottom of frame
copy & paste element 20, resize and flip, mirror and position to the side, behind your tube
sharpen more
copy & paste element 19, resize, sharpen & drop shadow as above
place at top of tag behind your tube layer
Resize element 32, position at bottom of tag, sharpen twice
resize bow 29 and place to the side of frame, sharpen & drop shadow
Add the bunny 51, resize and sharpen, place at bottom
Hide background layer & merge visible all other layers
unhide background and add a new raster layer above it, select all
copy & paste Paper1 into selection, select none
Apply mask, delete and merge group
copy element 34, resize and paste as a new layer above the mask layer, duplicate, image mirror, image flip - move into position and sharpen both layers
Add your name to the tag at the top
resize and crop to your liking
add any copyright info, delete background layer & save as a Png!

Winter Angel

Supplies
Tube of choice - I am using a beautiful angel by Steve Baier which may be purchased from UpYourArt
Scrapkit - a gorgeous freebie kit called 'Winter Angels' by Artmama which you can find here
Thank you!
Mask of choice
Font of choice
Xero porcelain
OK - open a new image in PSP 600x600 floodfill white
Copy Frame3 from the kit, paste as a new layer, click inside the centre of frame with magic wand, selections, modify, expand by 5
copy paper13, resize and paste as a new layer, drag below the frame layer, selections, invert and delete - copy & paste element 30 as a new layer above the paper layer, resize, position & hit delete again, select none
Paste your tube as a new layer, position and erase any overhang
apply xero porcelain default settings to your tube
Copy & paste ribbon 25, resize by 80% and position along the bottom below your tube
copy & paste feathers 39 & 40, resize slightly & position to the side
sharpen both and drop shadow 0 0 50 5
copy & paste element 9, resize and sharpen and position at bottom of feathers
Copy elements 31 and 32 and paste as new layers above the white background layer
resize and position and sharpen both layers
add a new raster layer above the background layer and select all
copy Paper1 and paste into selection, select none
apply mask of choice, delete and merge group
Copy embellishment 43, paste as a new layer above mask layer, resize and position, duplicate, image mirror, image flip
Add your name using a scripty font and add noise at uniform 40
Resize and crop your tag to your liking
add any copyright information
delete background layer & save as a Png!

Wednesday, 11 November 2009

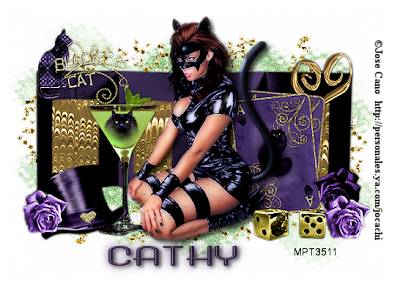
Feelin' Lucky


Supplies
Tube of choice - I am using the artwork of Jose Cano which may be purchased from MPT
Scrapkit - a beautiful ptu kit from KatNKDA called 'Black Cat' which is available to purchase from NK Art Shop
Mask of choice - I am using Becky Mask 038 here
Font I am using is BeautySchool Dropout
OK - Open a new image in PSP 650x550 floodfill white
Copy & paste the frames 08, resize to fit
Click inside each frame with magic wand, selections, modify, expand by 5
copy paper8, resize and paste as a new layer
selections, invert, delete and drag below frames, select none
add a drop shadow to frame layer 0 0 70 5
Copy playing card 42, resize & paste as a new layer, position and turn slightly using your raster deform tool, sharpen & apply same drop shadow, duplicate
on the bottom layer use your deform tool to turn it slightly in the opposite direction
Add your tube, position in the middle of frames and drop shadow 5 5 70 9
copy the glass 2, resize and sharpen, position
copy & paste one of the hats,I used 07, resize and place to the side of the glass
turn slightly with the deform tool, sharpen & drop shadow
resize the dice 40 and place at bottom of playing cards, sharpen twice and drop shadow
Add the black cat 25, resize and position on corner of frames, sharpen
resize the roses 46 and 47 , sharpen more, drop shadow & position at bottom of frame
I also added the heart 36 and positioned behind the playing cards
Hide white background layer and merge visible all other layers
resize by 85% and crop
unhide background and add a new raster layer above it, select all
Copy Paper 6 and paste into selection, select none
apply mask, delete and merge group, duplicate and mirror, flip
merge these 2 mask layers together, add noise at uniform 40
Copy element 45, resize by 50% and position above mask layer, sharpen & duplicate
image mirror, image flip and move into position
Add your name & copyright info
delete background layer & save as a Png!

Sunday, 8 November 2009

Remembrance Day


In honour of all our fallen troops who have been killed or maimed in Afghanistan


Lest we forget
They shall grow not old, as we that are left grow old: Age shall not weary them, nor the years condemn. At the going down of the sun and in the morning We will remember them.


Remember me

Supplies
Tube of choice - I am using artwork by Keith Garvey which may be purchased from MPT
Fab freebie tag template by KatNKDA which is only available for a short time so go grab it quick! here
thanks Kat !
Font-Kingthings wrote and Murro
plugins - Xero porcelain & radiance
This is a real quickie tut
open Kat's template, change the background colour to white
click on the purple frame backgrounds and select all, float, defloat
copy your tube of choice and paste as a new layer
position in the top frame then selections, invert, delete
paste your tube again and resize, position in the other top frame, hit delete
mirror your tube and paste as a new layer - position in bottom frame, delete
in the top tube layers, change one of them to screen
on the other top tube layer apply xero porcelain at default settings
on bottom tube layer apply xero radiance default settings
using the murro font - type out 'and don't you forget it'
position in the tag box and rotate using your deform tool
using the kingthings font, type the word Remember
position at top of tag to the left
then type 'my name' and apply a white gradient glow
add your name and apply a gradient glow
hide background and resize to your liking
add any copyright info
delete bakground layer & save as a png!

Saturday, 7 November 2009

Give Thanks!

Supplies
Tube of choice - I am using the artwork of Jose Cano available to purchase from MPT
Scrapkit - a beautiful freebie from Seachell 'Thankful Blessings' here
Thanks Seachell
Mask of choice or the one I am using can be found here
Fonts I used are Leaf1, Autumn Nights and Murro
eye candy gradient glow
xero porcelain
Ok - open a new image in PSP 600x600 floodfill white
Add a new raster layer and select all
copy Paper2 and paste into selection, select none
apply mask, delete and merge group
Copy element 35, resize and paste as a new layer
click inside the 3 frames and expand by 6
copy Paper 1, resize by 25% and paste as a new layer
selections, invert, delete and drag below frame layer, select none
drop shadow frame 0 0 70 5
Copy element 36, resize and sharpen, paste as a new layer
position at side of frames and apply same drop shadow
resize element5 and position in middle frame, below the frame layer
sharpen more and erase any overhang at sides
copy element 33, resize and position along the bottom, sharpen & drop shadow
copy & paste element 29, resize, sharpen & drop shadow
Add your tube and position - apply xero porcelain default settings and apply a heavier drop shadow, I used 5 5 70 11
add any elements from the kit you like and position on the tag
Add your words and name and give a gradient glow using colours from the tag
Hide the background layer & mask layer & merge visible all other layers
unhide the hidden layers, resize the tag layer by 85% and sharpen
Resize element2 and position above the mask layer, sharpen & duplicate a few times, mirror or flip and position how it looks best
add your copyright information
delete background layer & save as a Png

Monday, 2 November 2009

Bling

Supplies
Tube of choice - I am using the artwork of Ismael Rac available to purchase from AMI
Scrapkit - 'Bling Bling Baby' by AquaRebel315 which you can download here at Creative Misfits, it's the last one
Thank you!
Mask -Omask046 here
Font - AlSandra here
Plugins - xero porcelain and radiance
eye candy gradient glow
OK - Open a new image in PSP 600x600 floodfill white
Copy & paste double frame01 from the kit, resize by 80%, sharpen
click inside both frames with magic wand, expand by 6
add a new raster layer and floodfill black, select none
move this layer below the frame layer
drop shadow frame 0 0 70 5
On the frame layer, click inside one frame with magic wand, expand by 6
paste your tube as a new layer, resize & position, selections, invert, delete
move your tube layer below frame layer, select none
apply xero porcelain default settings
Back on your frame layer, click inside the other frame & expand by 6
mirror your tube, copy & paste as a new layer
invert & delete, select none and drag below frame layer
apply xero radiance at 128 50 128 255
Add your elements of choice from the kit, resize to fit, sharpen more & drop shadow all elements 0 0 70 5
Copy chainlink01 and paste as a new layer above background layer
resize by 65%, positionto the side, duplicate & mirror
move into position, merge down and sharpen
Add a new raster layer above background layer & floodfill black
Apply the mask, delete & merge group
Hide background layer & merge visible all other layers
resize & crop your tag to your liking
remember to sharpen when you resize
Type your words of choice along the top of tag
Add your name & copyright info
delete background layer and save as a Png!