Sunday 27 September 2009

Off to the sun

I am flying off to the sun on tuesday morning so I will be MIA for just over a week
Looking forward to just lying by the pool all day and partying all night
Never too old to party on hols!!!
See you when I get back :)

Autumn Angel

Supplies
Tube of choice - I am using a beautiful tube 'Autumn Fire' by KatNKDA which you can purchase from NK Art Shop
Scrapkit - a beautiful freebie mini kit 'Journee d'Automne' from Scrap and tubes
Thanks!
Autumn wordart by cupcake sprinkles
Thank you
Mask of choice - I am using Sabres otherworldfae mask2 here
Font of choice - I am using leaf1 which you can find at dafont
eye candy gradient glow (optional)
OK - Open a new image in PSP 600x600 floodfill white
Copy the notepad from the kit and paste as a new layer
turn slightly using your raster deform tool
Open the wordart and paste some on the notepad
change the opacity of the word layers to burn
copy the flower branch, resize and position to the side
use your eraser tool to erase the bottom of the branch so it looks like it is behind the flower
copy the flower pendant and paste as a new layer so it sits over the top flower
use your eraser tool to erase the metal ring, resize and sharpen
Copy & paste flower 3, resize and position on bottom right corner
Add your tube, resize, sharpen & drop shadow
resize one of the butterflies and place on the tag
Add a new raster layer above the background layer and floodfill with #3d0000
apply mask, delete and merge group
use your deform tool to push the mask in at top and bottom and pull out at the sides
Copy the Autumn Angel wordart & paste as a new layer, resize
select all, float, defloat, add a new layer and floodfill with #3d0000
select none and delete the original layer
position at top of tag
type your name using an orange colour from the flowers
apply a gradient glow using #3d0000
effects, texture effects, fur:
blur 1 density 10 length 64 transparency 192
hide white background layer and merge visible all other layers
resize and crop to your desired size
add your copyright info
delete the background layer & save as a Png!

The Rose

Supplies
Tube of choice - I am using the artwork of Steve Baier which is available to purchase from UpYourArt
Scrapkit - a ptu kit from Vella at Wench Designs called 'Shades of Red' which you can purchase from any of her stores listed on her blog
Mask of choice
Font of choice
Xero porcelain, radiance & soft mood
OK- Open a new image 700x550 floodfill white
Copy & paste Frame6 as a new layer
Click inside each frame with magic wand & expand by 6
add a new raster layer and floodfill black, select none
drag this layer below the frame layer
click inside the centre frame with magic wand & expand by 6 again
paste your tube as a new layer, position how you want it in the frame
selections, invert, delete and drag below frame, select none
Apply xero porcelain default settings to the tube layer
repeat above step with other 2 frames
Apply xero soft mood to one and radiance to the other
Add a drop shadow to the frame layer 0 0 70 5
Copy & paste bow3 as a new layer, resize & position on the frame
copy ruffle 1 and position along the bottom, resize
paste the rose(15) as a new layer, resize and use your deform tool to turn it so it lays along the bottom of the frames
copy bow1,resize and position over the stemof the rose
Copy the apple, resize and position to the side, duplicate & resize
Paste one of the birds as a new layer, resize & position to the side
sharpen & drop shadow all elements
Copy the ivy, colourise using hue and saturation 1 and 148
resize and paste as a new layer, position below the frames and sharpen, duplicate and mirror
Add a new raster layer above the background layer and floodfill black
Apply your mask, delete and merge group
Add your name & copyright info
delete background layer & save as a Png!

Friday 25 September 2009

A splash of innocence

Supplies
Tube of choice - I am using the artwork of Abranda Icle which is available to purchase from UpYourArt
Scrapkit - 'Splash of Gold' freebie kit from Shine Angel here
Thank you!
Font of choice - I am using Kingthings wrote
eye candy gradient glow
OK - Open a new image 600x600 floodfill white
Copy Frame06, resize and paste as a new layer
click inside the frame with magic wand, expand by 3
copy & paste Paper07 as a new layer, invert & delete
drag the paper below the frame layer, drop shadow frame 0 0 70 5
Copy Frame05, resize so that it is slightly smaller than the first frame
paste as a new layer and position inside the bottom frame
click inside the black frame with magic wand & expand by 3
Copy & paste Paper02 as a new layer, invert, delete and drag below frame
drop shadow frame layer same as before
resize arrangement01 and paste as a new layer, position inside the frames
copy & paste arrangement02, resize and position
copy foliage04, resize and rotate 90 degrees
positionto the side of the frame, sharpen & drop shadow 0 0 35 5
Copy deco03, resize and position along the bottom, sharpen & drop shadow
copy & paste button02, resize and position on bottom corner, sharpen
Add your tube, resize if necessary & drop shadow
Add some flowers & hearts from the kit and paste were desired
Hide background layer & merge visible all other layers
resize & crop your tag to desired size
Copy deco2, paste as a new layer above the background layer, resize and sharpen, position, duplicate & mirror, flip
Add your name and apply a gradient glow
Add your copyright info and save as a Png!

Black and Gold

Supplies
Tube of choice - I am using the artwork of Anthony Guerra which may be purchased from CILM
Scrapkit - ptu kit by Kat called 'Eleganza' which you can purchase from NK Art Shop
Masks WSL 220 and 221 here
Font of choice - I am using BickhamScriptFancy
Eyecandy Gradient Glow
OK - Open a new image in PSP 600x600 floodfill white
Copy Frame22, resize and paste as a new layer, sharpen
Copy element 14, paste as a new layer below the frame, resize & sharpen more
Click inside the centre of frame with magic wand, make sure you click in the spaces around the doodle too, expand by 7 add a new layer and floodfill white, drag below the frame layer
paste a close up of your tube, position, invert and delete
lower the opacity of your tube layer
Now copy & paste your main tube
position it below the frame layer, duplicate and move the top layer above the frame layer
you can now erase any bits covering the doodle
add a drop shadow to the bottom tube layer 5 5 70 9
Drop shadow frame layer 0 0 70 5
Copy the black flower (31) resize & paste as a new layer, position on side of frame, sharpen & duplicate, image mirror and bring back over beside the other flower
Resize the bird(13) and paste as a new layer, mirror & position, sharpen
Copy butterfly(12), resize, sharpen & position
Copy & paste bow05, resize and position at the side
resize element 2, sharpen and position in centre of bow
Copy element 19, resize & sharpen, position at bottom over the roses, use your deform tool to position, duplicate and move to top and position behind the bow
Hide the white background layer & merge visible all other layers
resixe by 85% and crop
Unhide background and add a new raster layer above it, select all
copy Paper14, resize and paste into selection, select none
Apply Mask 220, delete & merge group, add noise uniform 40
Add a new raster layer above this layer, select all
Copy Paper3, resize & paste into selection, select none
Apply mask 221, delete & merge group
Use your deform tool to push in at the sides
Add your name using black as your background colour
Add a gradient glow using #bd9b5e
Add your copyright info
delete background layer & save as a Png!

Sunday 20 September 2009

The Raven

Supplies
Tube of choice - I am using this beautiful tube from KatNDKA which can be purchased from NK Art Shop
Scrapkit - 'Scream at the Night' a great freebie kit from Lacarolita's Designz here
Thanks!
Mask I am using is WSL 221 which you can find here
Font of choice - I am using Twilight and Tahoma
Ok - Open a new image 650x650 floodfill white
Add a new raster layer, select all and paste a background or paper of choice into selection, select none (I am using the background image that came with the tube)
Open the gates from the kit, copy & paste as a new layer
resize slightly & drop shadow 5 5 70 5
Copy & paste the gravestone below the gates layer, resize, sharpen & drop shadow
Resize the stars layer and paste as a new layer, sharpen more
Add any elements from the kit you like
I added the moon, a bat and one of the cats
Paste your tube as a new layer, position, resize if necessary and drop shadow
Add a new raster at the top, select all, contract by 6, invert and floodflill selection with black
Resize all layers by 85% and sharpen
Open a new image 600x600 floodfill white
Copy merged your tag onto this new image
select all, float, defloat, effects, 3d effects buttonize
Height & width at 20
Opacity 75
Transparent
select none
Copy Paper 8 from the kit and paste as a new layer above background
Apply mask, delete & merge group
Use your deform tool to push in the sides slightly
Type your words of choice around the frame
I used some quotes from 'The Raven' poem and lower the opacity of the words
Add your name and copyright info
Delete the background layer & save as a Png!

Saturday 19 September 2009

Wicked Desires


Supplies
Tube of choice - I am using the artwork of Jessica Dougherty available to purchase from CILM
Template #4 by Aqua here 4th set down
Scrapkit - a mini freebie kit from Juicy Bits 'Disorderly Conduct' here
Thanks
Font of choice
Mask of choice
Cybia screenworks (optional)
OK - Open the template in PSP, delete the copyright layer
Resize all layers by 85%
Click on the large rectangle layer, select all, float, defloat
Copy Paper13 and paste as a new layer
selections, invert, delete and select none
Add a drop shadow 0 0 70 5
delete the original layer
Repeat above step on all layers using papers from the kit
On the WICKED layer fill with a gradient using 2 colours from your tube
Add any elements from the kit you like
Paste your main tube and drop shadow 5 5 70 11
Add a new layer above the background layer and floodfill with a pink from the kit
Apply mask of choice, delete & merge group
Apply cybia screenworks pinhole set at 0 to the mask layer
Add your name & copyright info
Animation
Copy merged your tag into animation shop as a new image
Go back to PSP and clickon the WICKED layer
Adjust brightness & contrast both set at 10
copy merge into ani shop and paste after current frame
back to PSP and adjust brightness & contrast again but change both to 20
copy merged into ani shop after current frame
You can now view your animation & if happy save as a Gif

Good v Bad

Supplies
2 tubes or images of choice from same artist - I am using images from KatNKDA which are available to purchase from NK art shop
Template #28 by vix here
Thanks!
Mask of choice
Font of choice
Xero improver
Open the template in PSP, delete the copyright layer, open the white background layer
Select the frame backgrounds one at a time, float, defloat and paste your image as a new layer
resize to fit, sharpen & apply xero improver: 9 30 9
Select the large pink background layer, float, defloat and add a new raster layer
paste your image of choice into selection, select none
(I am using the background image from the angeldust tube)
lower the opacity of this layerto around 50
Move the top wordart to the side and resize
colourize the Good Girls and lower the opacity
Move the Bad Girls down slightly and colourize to suit your tube
Add any elements of choice
I just added the bird which comes with one of Kat's tubes
Hide background layer & merge visible all other layers
resize by 85% and sharpen
unhide background and add a new raster layer above it
floodfill with a light grey colour and apply a mask of choice
add noise to the mask layer at uniform 40
add your name & copyright info
delete background & save as a Png!

Friday 18 September 2009

Fallen Beauty

Supplies
Tube of choice - I am using the artwork of Jennifer Janesko which may be purchased from CILM
Scrapkit - a cute freebie add-on called 'Timeless' from Raspberry Road Designs here
Thanks!
Mask - I am using WSL 275 which you can find here
Font of choice
OK - open a new image 700x600 floodfill white
Copy the Frame (09) and paste as a new layer, resize and sharpen
click inside frame with magic wand & expand by 5
Copy Paper(3) resize by 20% and paste as a new layer
selections, invert, delete and drag below frame
resize element 8 and paste as a new layer, delete again and select none
Copy element 13, paste as a new layer, resize, sharpen and position along the bottom
image flip, image mirror - position at top
Copy flower(18) resize and position, duplicate and resize again, mirror
sharpen both and drop shadow 0 0 70 5
Copy element 20 , resize and position at side, sharpen & add same drop shadow
Paste your tube as a new layer, position & drop shadow
5 5 70 9
resize the butterfly, sharpen & drop shadow & position
Hide white background layer & merge visible all other layers
unhide background and add a new raster layer above it, select all
Copy Paper1 & paste into selection, select none
Apply mask, delete & merge group, add oise at uniform 40
Add your name & copyright info
delete background layer & save as a Png!

I've been tagged...

KatNKDA has tagged me with this survey - so here goes...

1. How long have you been using PSP, PS?

I have been using PSP for about 5 yrs - have never used photoshop.

2. How did you get into making tags, scrap kits?

I used to belong to a trivia group on MSN and people in there used to post 'tags' and I was fascinated by them and how they done them...so I got myself a trial version of PSP...joined a tutorial group...and before I knew it I was hooked!

3. Who's your fave artist?

Oh there are so many to choose from, I love the pin-up artists - some of my favs are David Boller, Michael Landefeld, Brian Rood, Jessica Dougherty and of course Ismael Rac!


4.Who`s your favourite Scrap Designer?

Well thats an easy one....Kat of course...lol I love her kits and am always waiting in anticipation for her new releases!!

5. Which three blogs do you visit everyday?

I visit quite a few blogs everyday, mostly scrap artists to see if they have any new kits up....too many to mention again....

I will pass this survey on to Kathy from Kathy's Place

Tuesday 15 September 2009

Tickled Pink

*Click on tag to view animation
Supplies
Tube of choice - I am using the artwork of Anthony Guerra which may be purchased from CILM
Scrapkit - a beautiful freebie called 'BCA-2009' by Bluedream Designs here
Thank you!
Mask of choice - I am using WSL 84 here
Font of choice
OK- open a new image 600x600 floodfill white
Copy Frame 4 and paste as a new layer
click inside the frame with magic wand and expand by 5
copy & paste a paper of choice as a new layer
selections, invert, delete and drag below frame
copy the diamond rain paste as a new layer, position and hit delete again
select none and add a drop shadow to frame layer 0 0 60 5
sharpen the diamond rain layer
Paste your tube as a new layer, position and drop shadow
Copy & paste the labels, resize and use your deform tool to turn them slightly
Copy & paste the journal, resize and position
Add the tag and place at the top of the frame
sharpen & drop shadow all elements
Add your name to the tag
Paste a paper of choice as a new layer above the background layer
Apply mask, delete & merge group
resize all layers by 85%
add your copyright information
Animation
Click on the diamond rain layer and add noise at 45, click uniform once
Copy merged into animation shop as a new layer
back to PSP, edit, undo noise
apply noise again and click the uniform button twice
copy merged into animation shop after current frame
repeat above steps, clicking uniform three times
View your animation & if happy save as a Gif!

Shabby Treasures


Supplies

Tube of choice - I am using the artwork of Ismael Rac which can be purchased from AMI
Scrapkit - a beautiful ptu kit from KatNKDA which you can purchase here at NK Art Shop
Mask of choice - I am using Babes Mask 16 here
Font of choice - I am using Tagettes

OK - open a new image 600x600 floodfill white
Copy element5, paste as a new layer and resize
Paste your tube, resize if necessary and position
erase any overhang at the bottom of the frame
Copy element 31, paste as a new layer and mirror, resize slightly
position it at right side of frame
Copy element 32, paste as a new layer, resize and position at left side
Resize element 12 and position on the doodle, sharpen more and duplicate
move the duplicate over to the opposite side & position
Copy the teddy 11,resize and position at the corner of the frame
resize one of the bows, I used bow 21 and position on the teddy
Copy element 10, resize & paste as a new layer on bottom left of frame
sharpen & drop shadow, duplicate and mirror & bring back beside the original
Resize element 9 and paste as a new layer on top of these 2 layers
sharpen & drop shadow
Copy the butterfly 13, resize and position at the bottom
sharpen & drop shadow
Hide the background layer & merge visible all other layers
resize by 85% and crop
Unhide background & add a new raster layer above it, select all
Copy Paper 4 and paste into selection, select none
Apply mask, delete & merge group
Copy elements 27 and 28, resize both and paste as new layers above the mask layer
sharpen both and position
Add your name & copyright info
delete the background layer & save as a Png!

Saturday 12 September 2009

End of Summer

Supplies
Tube of choice - I am using the artwork of Keith Garvey available from MPT
Scrapkit - a beautiful mini kit freebie from A-liya's Dreams here
Wordart by Vaybs which you can download here
Thanks ladies for the great freebies
Mask of choice
Font of choice
Eye candy gradient glow
OK- open a new image 600x600 floodfill white
Copy & paste Frame1 as a new layer, resize and colourise to suit your tube by using the adjust hue and saturation settings
Click inside the frame with magic wand and expand by 5
Copy Paper2, resize and paste as a new layer, position
selections, invert, delete and select none
drag this layer below the frame
drop shadow frame layer 0 0 55 5
Resize the swirl, colourise and sharpen more, paste as a new layer over the frame
Copy & paste one of the pearls, colourise and place at the top of frame above the swirl
Resize the sun and positon around the pearl, sharpen
Copy the flower, resize, sharpen & drop shadow, place at bottom of frame
duplicate & mirror and bring back over ontop of the original flower
Paste your tube as a new layer, drop shadow 5 5 70 9
Copy & paste leaf1, resize and place at the bottom so part of it is showing behind the frame
Do the same with coral 1
colourise if necessary, sharpen both elements
Resize the wordart and paste as a new layer
add a gradient glow using a colour from the tag
Add your name and apply a gradient glow using same colour
Add a new layer above background layer & select all
Copy & Paste Paper3 into selection, select none
Apply mask, delete & merge group
Resize & crop your tag
Add your copyright info
delete background layer & save as a Png!

Who's afraid of the dark?


Supplies
Tube of choice - I am using the artwork of Elias Chatzoudis available from MPT
Scrapkit - fantastic PTU kit from KatNKDA called 'Morbid Nobility' which you can purchase here Mask - I am using WSL 289 which you can find here
Candle flame here
Font of choice - I am using Bloody and Bickham Script
Eye candy gradient glow

Ok - open a new image in PSP 700x600 floodfill white
Copy element 31 and paste as a new layer
With your selection tool set on rectangle, draw a selection around the inside of the frame
Copy element 08 and paste as a new layer, position
selections, invert, delete and select none
Copy element 23 and paste as a new layer below the frame, resize and position at the bottom
Copy element 13 and paste as a new layer above the frame layer, resize
position along the bottom of the frame
Resize element 10 and position along the top of the frame
Add your tube and dropshadow
Copy element 5, resize and paste as a new layer on left side
Copy the butterfly 22, resize and place at the top of the frame
Type your words along the bottom of the tag
Add a new raster above the background and select all
Copy Paper1 and paste into selection, select none
Apply mask, delete and merge group
Resize all layers by 85%
Add your name using white as your background colour
apply a small gradient glow using a pink colour from the tag
Add your copyright information

Animation
merge the 2 doodle layers together and duplicate three times
add noise to the bottom layer at 40, 2nd layer 42, 3rd 44 and top layer 46
hide the top 3 layers and copy merged your tag into animation shop as a new image
Back to PSP, hide the bottom doodle layer and unhide the next one
copy merged into animation shop after current frame
repeat above step for the next 2 layers
Open the candle flame in animation shop
edit, select all, edit copy
click on your tag, edit select all, edit, paste into selected frame
position the flame on top of the candle and release the mouse
You can now view your animation
save as a gif!

Friday 11 September 2009

Tonight is gonna be a good night!


*click on tag to view animation
Supplies
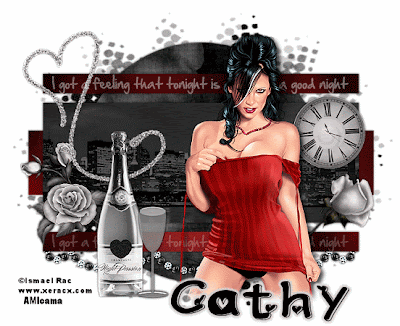
Tube of choice - I am using the beautiful artwork of Ismael Rac available to purchase from AMI
Scrapkit - a fab freebie from Scrapsdimensions called 'Night Passion' here
Template #52 by Sara here
Mask Vix mask 147 which you can find here
Thanks ladies for the great freebies
Font of choice
OK - Open the template in PSP
delete the wordart & copyright layers
Select the middle black rectangle layer, float, defloat
open the romantic skyline from the kit, copy & paste as a new layer, position
selections, invert, delete and select none
lower the opacity to around 60 and merge down, drop shadow
0 0 70 5
Select the circle layer, float, defloat
copy & paste Paper4 as a new layer, resize by 70%
selections, invert, delete and select none
delete the original circle and add drop shadow as above
Select the large grey rectangle and floodfill with a gradient using 2 colours from your tube
Do the same with the 2 thin rectangles layer
Type the words 'I got a feeling that tonight is gonna be a good night'
lower opacity slightly and duplicate, move down & position in the bottom rectangle
Resize the clock and paste as a new layer, sharpen & drop shadow
Copy Rose1 and Rose2, resize both and position on either side
sharpen and drop shadow
Copy the champagne bottle and flute, resize, sharpen & drop shadow
Add your tube, position and drop shadow 5 5 70 9
Paste the string of beads along the bottom, sharpen more & drop shadow
Resize glitter swirl 1 and paste as a new layer, position & sharpen more
duplicate this layer twice and add noise at 35, 40 & 45 to each layer
Add a new layer above the background layer and floodfill black
Apply mask, delete and merge group
Add your name and copyright information
Animation
Close off the top 2 glitter swirl layers & copy merged into animation shop as a new image
back to PSP and hide the bottom swirl layer, unhide the middle layer
copy merged into animation shop and paste after current frame
back to PSP, hide middle swirl layer, unhide top swirl layer
copy merged into animation shop & paste after current frame
View your image and if happy, save as a gif!

Wednesday 9 September 2009

Happy Time

Supplies
Tube of choice - I am using the artwork of Ismael Rac which may be purchased from AMI
Scrapkit - a beautiful freebie from Bea called 'Happy Time' here
Thanks!
Font of choice
eye candy gradient glow (optional)
Ok - open a new image 600x600 floodfill white
Copy the heart frame6 and paste as a new layer
click in centre of frame with magic wand, expand by 5
copy Paper5 and paste as a new layer, selections, invert, delete
bring the paper layer below frame, paste a close up of your tube, position and delete again
select none and change the opacity of your tube layer to soft light
drop shadow frame layer 0 0 55 5
Paste your main tube, position & drop shadow 5 5 70 9
copy flower5, resize and paste as a new layer on the top left of the frame
copy & paste beadstring2, resize and position, sharpen
paste a flower of choice at bottom and position behind your tube
resize the notebook and pencil1, position at bottom left
use your deform tool to turn the notebook slightly to the left
copy & paste ribbon 2 as a new layer, resize sharpen & drop shadow
position along the bottom of your tube
copy bead1 and bead2, paste both as a new layer above the background layer
rezize and duplicate, move into position and merge these layers together
copy glitter1 and glitter2, paste as new layers below the beads, merge down and duplicate
image flip, image mirror, move into position
hide the white background layer & merge visible all other layers
resize and crop to your liking
add your name using one of the papers as a background fill pattern
add your copyright info
delete the background layer & save as a Png!

Monday 7 September 2009

Chills and Thrills


*click tag to view animation
Supplies
Tube of choice - I am using a beautiful tube by KatNKDA called 'Black Widow' which is available to purchase from NK art shop
Scrapkit - also by KatNKDA this fantastic ptu kit called 'Nightmare' available from NK art shop
Mask of choice
Font of choice
animated spider here
OK - open a new image 700x600 floodfill white
Copy element 13 from the kit, resize and paste as a new layer
click in centre of frame with magic wand & expand by 6
Copy Paper3, resize & paste as a new layer, selections, invert, delete
drag the paper layer below the frame and select none
add a drop shadow to frame 0 0 70 5
resize element 40 and paste above the paper layer
Copy element 02, resize and paste to the side of frame, tilt slightly using your deform tool
resize element 25, sharpen and paste at opposite side of frame
copy element 39 overlay, resize and paste as a new layer, sharpen
Add your tube and apply a drop shadow 5 5 70 9
resize some bats from the kit and paste as a new layers, position at top of frame
Type the words along the top
hide white background layer & merge visible all other layers
resize by 85% and sharpen, crop your tag
unhide background & add a new raster layer above it, select all
Copy a paper of choice from the kit, resize & paste into selection, select none
Apply your mask, delete & merge group
Add your name & copyright info
Animation
Open the spider in animation shop
resize all layers by 65%
copy merged your tag and paste as a new image in ani shop
duplicate until you have 4 frames
click on the spider, edit, select all, edit copy
click on your tag, edit select all, edit paste into selected frame
place the spider on the web
you can now view your tag and if happy save as a Gif!

Saturday 5 September 2009

Back to Nature

Supplies
Tube of choice -I am using the beautiful artwork of Greg Horn available to purchase from CILM
Scrapkit - 'Back to Nature' blog train freebie from Seachell Scrapz here
Thanks!
Mask I am using WSL 84 which you can find here
Font of choice - I am using Autumn Nights
OK - Open a new image in PSP 600x600 floodfill white
Copy element 39 from the kit, resize and paste as a new layer
position in centre of image
Resize element 22 by 50% and paste as a new layer
Copy the boxes 23, resize and paste as a new layer, position to the side, sharpen and drop shadow 0 0 70 5,
copy flower 13, resize and position beside the boxes
Resize element 16 and place at the top so it is covering the chain,
copy element 5, resize and position so it is covering the other chain at the top
Copy & paste element 1 as a new layer, resize and image mirror, position
Copy element 19, resize and place at the bottom on the opposite side from the boxes
resize the buterlies 11 & 12 and place on the tag where they look best
Copy the bird 42, resize and position
Sharpen & drop shadow all elements as above
Add your tube, position and drop shadow 5 5 70 9
Hide white background layer and merge visible all other layers
resize and crop to desired size
Unhide background and add a new raster layer above it, select all
Copy Paper 2 and paste into selection, select none
Apply mask, delete and merge group
Add your name and copyright info
delete background and save as a Png!

Tuesday 1 September 2009

Kisses sweeter than wine

Supplies
Tube of choice - I am using the artwork of Anthony Guerra available to buy from CILM
Scrapkit - a beautiful ptu kit from Kat called 'Chardonnay' which you can purchase from NK Art Shop here
Mask of choice - I am using Kat's angelic mask01 which you can find here
Thanks Kat!
Font of choice
Xenofex constellation (optional)
OK - open a new image 700x600 floodfill white
Copy element 1, resize and paste as a new layer
click inside with magic wand, expand by 5 and paste a paper of choice as a new layer
selections, invert, delete and drag below frame, select none
merge these 2 layers visible
Copy element 13, resize and paste as a new layer on top
click inside each frame one at a time and expand by 5
paste a paper of choice in each frame, invert, delete and bring below frame layer
add a drop shadow to the frames 0 0 70 5
Copy element 6, mirror and flip, resize and position on the frames
Resize bow 4 and paste along the top of frames
Copy element 22, resize and position at the bottom
resize the wine glass 02, wine bottle 27, and cork 25
position these elements at the bottom, sharpen all and drop shadow
Copy tag 20, resize and place in middle of frames, sharpen & drop shadow
use your deform tool to turn it slightly
Add your tube and apply a drop shadow
Type your name in the tag
Add your words of choice along the bottom of tag
Hide white background and merge visible all other layers
resize & crop to your liking
unhide background and add a new raster layer above it, select all
Copy a Paper of choice into selection, select none
Apply mask, delete and merge group
Apply constellation to mask layer, settings: small star field, default settings
keep original image ticked
Add your copyright information
Delete the background layer & save as a Png!