Thursday, 30 July 2009

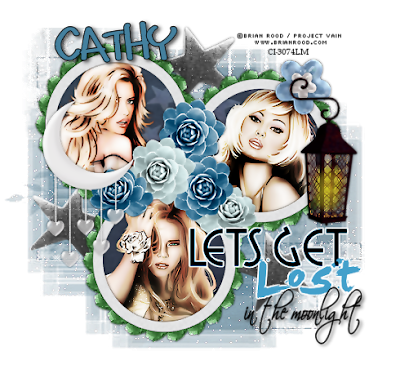
Lost in the moonlight


Supplies
3 tubes of choice from the same artist - I am using the artwork of Brian Rood which you can purchase from CILM
Scrapkit - 'A fairytale night' freebie by Vaybs which you can downlaod here
thanks Vaybs!
Mask - miggs mask1 here
wordart by Beth which you can find here
thanks ladies!
Xero radiance
Fonts of choice - I am using scriptina & murro
OK - open a new image 600x600 floodfill white
Copy Frame19 and paste as a new layer, resize by 85%
click inside the 3 frames with magic wand & expand by 6
Copy Paper6, paste as a new layer, resize by 85% and position, selections, invert, delete and select none, drag this below the frame layer
Add a drop shadow to the frame 0 0 70 5
Click in each frame one at a time, expand by 6 and paste your tube, selections, invert, delete and bring below frame layer, apply xero radiance to your tube layers:
128 50 128 255
Copy lantern 8 & paste as a new layer, resize, image-mirror, position to the side of the top frame
resize the blue & white flowers and place under the lantern
sharpen both & drop shadow
Copy star 18, resize and position below the frame to the side, duplicate twice and move into position (see tag above) sharpen and drop shadow
Copy the moon& stars 14, resize and mirror, place on the top left frame, drop shadow
Add a new raster layer above the white background layer, select all
Copy Paper7 and paste into selection, select none and apply mask, delete & merge group
duplicate the mask layer & merge down
Add the wordart and colourise using adjust hue & saturation
Using scriptina font type the words 'in the moonlight' and position below the wordart
drop shadow 2 3 67 7
Add your name & copyright info, delete background layer & save as a Png!

Wednesday, 29 July 2009

Sleeping Beauty Awakes

Supplies
Tube of choice - I am using the artwork of Ismael Rac available to purchase from AMI
Scrapkit - 'Sleeping Beauty' another gorgeous ptu kit by Kat at KatNKDA
you can purchase the kit here
Wordart by Melissa which you can find here
Mask - Babes mask 18 here
xenofex constellation
eye candy gradient glow
Font of choice
OK - open a new image 700x600 floodfill white
Copy element21, resize by 65% twice, paste as a new layer
using your selection tool set on circle, draw a selection inside the frame
Copy Paper7, resize by 65% and paste as a new layer, selections, invert, delete
drag below the frame layer, do not deselect yet
Copy element28, paste as a new layer and resize, then copy & paste element6, resize, position so it looks like the ladder is attached to the door then hit delete on both these layers, select none
Sharpen the rose frame layer, hide the white background layer and merge visible
Unhide the background layer, paste your tube as a new layer, drop shadow 5 5 70 11
Resize element2 and paste as a new layer, position to the side, sharpen & add drop shadow
Copy & paste element 18, resize and position on the frame
Type your name using a font of choice and add a small gradient glow
Open element 19, resize and paste as a new layer below the frame, position and sharpen
Add anew raster layer above the background layer and select all
Copy & paste Paper21 into selection, select none & apply mask, delete & merge group
Use your deform tool to pull the sides of the mask out slightly
Apply xenofex constellation to the mask layer
settings: small star field, star size 2 the rest of the settings default and change to keep original image
Add the wordart, resize and colourize and add a small white gradient glow
Add your copyright info, delete the background layer, save as a Png!

Monday, 27 July 2009

Closest thing to Crazy

Supplies
4 tubes of choice from same artist -I am using the artwork of Robin McQuay which may be purchased from UpYourArt
Scrapkit - 'Black Widow' gorgeous greebie kit from Kat at KatNKDA here
Thanks Kat!
Masks of choice - I am using wsl 221 and 223 here
Eye candy gradient glow
Xero porcelain and improver
Font I am using is Romance Fatal here
OK - open a new image 600x600 floodfill white
Copy Frame4 from the kit, resize and paste as a new layer
click inside all the frames with magic wand, selections, modify, expand by 6
Copy paper11 and paste as a new layer, selections, invert, delete and drag below the frame layer, select none - drop shadow the frame layer 0 0 70 5
Click inside each frame one at a time, expand by 6 and paste your tubes as a new layer, selections, invert, delete and drag the tubes below the frame layer, apply xero porcelain to each tube at default settings
Copy & paste wrap19, resize and position across middle of frames, sharpen
Resize element3 and paste as a new layer on bottom corner of frames, sharpen
Resize element 18 and paste as a new layer over the bow on the wrap, sharpen more
Resize the spider 7 and paste as a new layer wherever it looks best, sharpen more
Copy the wordart, paste as a new layer, resize and add a gradient glow using a grey colour
Position at the top of the tag
Hide white background & merge visible all other layers, resize by 85% and apply xero improver at default settings
Unhide the background layer and add a new raster layer above it, select all
Copy Paper9 and paste into selection, select none
apply mask221, delete and merge group
Add a new layer above this mask layer
Open element 10 and change your background to pattern use this element as your pattern and floodfill the new layer, apply mask 223, delete and merge group
copy element 5, resize and paste as a new layer above the mask layers, sharpen and duplicate, image mirror, image flip, and position so just a bit is showing at the sides
Add your name and copyright info
Delete the background and save as a Png!

Sunday, 26 July 2009

Shocking Pink

Supplies
Tube of choice - I am using the artwork of Jessica Dougherty available to purchase from CILM
Template 2sexy by Stu here
Thanks Stu!
Mask -0mask046 here
Eye candy gradient glow
Penta.com jeans
Font of choice
OK - Open the template, delete the copyright layers and resize all layers by 80%
Add a new raster and bring it to the bottom, floodfill white
Using a dark pink and light pink colour make a gradient glow
angle 0 repeats 1
Click on the 2 inner frames with magic wand and floodfill with the gradient
floodfill the black rectangle with the same gradient
Click on the 2 outer frames with magic wand, expand by 1 and add a new raster layer, floodfill black and select none - drop shadow 0 0 70 5
Floodfill the rectangle frame with black also
Select the stars layer and floodfill black
select the words and floodfill black
Add a pink gradient glow to the words layer
Click inside the S with magic wand, add noise at random 7, colourise and sharpen more
Click inside the 2 pink frames with magic wand and copy your tube, selections, invert, delete
drop shadow both tubes 5 5 70 9 and apply penta jeans default setting
Add your main tube, position to the side and drop shadow 5 5 70 11
Make another gradient glow using the dark pink and black
add a new raster above the white background layer & floodfill with this gradient
Apply mask, delete and merge group, reduce the opacity of the mask layer slightly
Add your name using font of choice and black as your foreground & background colour
Apply pink gradient glow as before
Add your copyright information, delete white background layer
resize & crop your tag, save as a Png!

Friday, 24 July 2009

Call of the Wolf

Supplies
Tube of choice - I am using the artwork of Brian Rood which you can purchase from CILM
Scrapkit - 'Shapeshifter' ptu kit from KatNKDA which you can purchase HERE
Thanks Kat for another beautiful kit!
Mask - montiblind mask1 here
Font of choice
OK - Open a new image 700x600 floodfill white
Open Frame40, copy & paste as a new layer, resize to suit
Using your selection tool on rectangle, draw a selection around the inner frame
Open element 32 and merge visible, copy and paste as a new layer, resize and position it so the wolf is visible in the left corner, selections, invert, delete and drag below the frame layer
select none
Copy & paste element 29, resize and position below the paper layer to the right of the tag, use your deform tool to turn it slightly to the right, sharpen and drop shadow 0 0 70 5
Resize element8 and position, using your selection tool set on circle, make a selection and paste the wolf 37 as a new layer, resize til it fits inside the frame, selections, invert, delete and lower the opacity slightly or change the setting to overlay
Paste your tube as a new layer, position and drop shadow
Resize element 26 and 33 and paste along the bottom, sharpen both and drop shadow
Copy element 18, resize and paste along the bottom of the frame, sharpen & DS
Type your words of choice, add your name & copyright info
Add a new layer above white background layer & select all
Copy Paper18 into selection, select none & apply mask, delete & merge group
Hide white background layer, merge visible all other layers, resize and crop
Delete the white background & save as a Png!

Wednesday, 22 July 2009

Whoooohooooo I got an award


This is my first ever blog award!!
I received it from KatNKDA Digital Art& Scraps
Thank you Kat :)
The rule is to give this award to 5 blogs of your choice and drop them a note, so they know they received the award. These are the blogs I give the award to :

Tuesday, 21 July 2009

Make a wish

Supplies
Fairy tube of choice - I am using the artwork of Dominic Marco which you can purchase from CILM
Scrapkit - 'Antique Beauty' from Simply Sensational Scraps HERE
Thanks for the fab freebie!
Mask - wsl 178 here
Font - 2peas gg mix here
Plugins - xenofex constellation
eye candy gradient glow
OK - open a new image 600x600 floodfill white
Copy Frame1 from the kit, resize by 85% and paste as a new layer
Click inside the frame with magic wand & expand by 5, copy paper8 and paste as a new layer
selections, invert, delete and drag below frame, select none
drop shadow frame 0 0 50 5
Copy flowerswirl 2, paste as a new layer along the side of frame, resize as necessary, sharpen more and drop shadow as above, duplicate & mirror
Resize diamond butterfly4 and paste as a new layer on top corner of frame, sharpen more & drop shadow, use your deform tool to turn it slightly
Resize lace flower2 and paste on the left side of frame, duplicate twice and position side by side, sharpen & drop shadow, copy a bow of choice, resize & position on top left of frame
Add your tube, drop shadow 5 5 70 9
Copy & paste broach2, resize, sharpen more & drop shadow and position on bottom right of frame - hide white background and merge visible all layers
Resize by 85% and crop your tag
Add a new raster layer above the background layer, select all and paste paper13 into selection, select none and apply mask, delete & merge group
Apply xenofex constellation to mask layer - settings: small star field
3;6;8;1;100;55 keep original image
Type the words 'make a wish' or other saying of choice and add a gradient glow using the green colour from the tag and use the same settings for your name
Add your copyright info
Delete white background and save as a Png!

Sunday, 19 July 2009

A touch of class

Supplies
Tube of choice - I am using the artwork of Pinuptoons available to purchase from CILM
Scrapkit - 'Brown Sugar' by Lacarolita which you can download HERE
Thanks for the gorgeous kit!
Masks - wsl 208 and 212 both HERE
Fonts - I am using shark random funnyness HERE and Bickham Script Fancy HERE
Eye candy gradient glow
OK - open a new image in PSP 600x600 floodfill white
Add a new raster layer and select all, copy paper6 into selection, select none and apply mask 212
delete and merge group, resize by 80%, sharpen and drop shadow 0 0 70 5
Copy Paper7 and paste as a new layer below the mask layer, apply mask 208, delete and merge group, use you raster deform tool to push the top and bottom in a bit
Copy Frame 3, resize so it fits nicely inside the circle, sharpen and drop shadow
Click inside the centre of frame and expand by 6, copy a paper of choice as a new layer, seletions, invert, delete and drag below the frame, now paste a close-up of your tube and hit delete again
Copy and paste the 2 buttons, a bow of choice and some flowers, resize all, sharpen and drop shadow as above
Paste your main tube and position to the side of the tag, drop shadow 5 5 70 9
Using the shark random font type the words 'A touch of class' and add a gradient glow using the yellow colour from the kit
Add your name & copyright info
Resize & crop to your liking, delete the white background layer & save as a Png!

Saturday, 18 July 2009

Twilight

Click tag to view animation!
Supplies
Tube of choice - I am using a free image from Zindy Zone which you can find HERE
Scrapkit - 'Twilight Romance' a fantastic ptu kit by Kat which you can purchase HERE
Mask - I am using Babes Mask 32 HERE
Font I am using is Tintoretto here
Plugins -Xero porcelain and improver
OK - Open a new image 650x650 floodfill white
Copy Frame02 and paste as a new layer, resize and click inside the centre with magic wand, expand by 5, copy and paste Paper14 as a new layer, resize by 75%, selections, invert, delete, drag the paper layer below the frame then paste your tube and position, hit delete again, select none - highlight the frame layer and drop shadow 0 0 70 5
highlight the tube layer and add xero porcelain, default settings
Hide white background layer and merge visible all other layers, unhide background
Copy element 29, resize and sharpen and position at bottom of frame, select all, float, defloat
Copy element 25, resize and position to the side of the tag, selections, invert, delete, erase the bit of the arm that is covering the Clair de lune words
Copy elements 5 & 6, resize both and position, drop shadow as above
Resize element21, position below the frame so just part is showing out the side, duplicate and resize by 75%, move up a bit, merge these 2 layers and sharpen
Copy element 43, paste as a new layer, resize and mirror, position along top of tag
Resize element17, position over the ribbon, sharpen more and drop shadow
Copy element23 , paste as a new layer above the background layer, resize so that just the bat is showing at top of frame, use your eraser tool to erase any bits at the sides
Copy element 22, paste as a new layer, mirror, resize and position
Hide white background layer and merge visible all layers, resize by 85% and apply Xero improver at default settings
Unhide background and add a new layer above it, select all, copy element26 and paste into selection, select none and apply mask, delete and merge group
Add your name and copyright info
ANIMATION
Make sure you are on the right layer and using your freehand selection tool draw around the apple, add noise at uniform 30, select none and copy merged into ani shop
Back to PSP, edit undo select none, undo noise and add noise again at 32, copy merged into ani shop after current frame - repeat above steps once more changing noise to 32
View your animation and save as a gif!

Black Swan

Supplies
Tube of choice - I am using the artwork of Shawn Palek available to purchase from UpYourArt
Scrapkit - 'BlackSwan' ptu kit by KatNkda which you can purchase HERE
Thank you!
Mask - wsl 84 here
Font of choice - I am using TK doodle here
OK - open a new image 600 x 600 floodfill white
Copy Frame14 and paste as a new layer, resize to your liking
Add a new raster layer above the background layer and select all, copy music sheet, element 21 and paste into selection, select none, apply mask, delete and merge group
Copy 38 background and paste as a new layer above the mask layer, resize so that it is just slightly showing outside the sides of the frame
Now paste your tube above the frame layer, position and drop shadow 5 5 70 9
Copy Swan01, resize and paste as a new layer, mirror and drop shadow as above
copy ballet shoes 08, resize and paste as a new layer, position against the swan, sharpen & drop shadow - resize the beads 36 and position along the top of frame, sharpen more and drop shadow - copy doodle 26, resize and position at top of frame, sharpen more & drop shadow
Add your name - foreground & background both black then add a gradient glow using a pink colour from the tag
Add any copyright info, resize & crop your tag
delete the white background layer & save as a Png

Friday, 17 July 2009

Pain and Sorrow

Supplies
Tube of choice - I am using the artwork of Jessica Dougherty which may be purchased from CILM
Scrapkit - 'Whispers in the Wind' freebie blog train kit from Juicy Bits HERE
Thank you!
Mask - wsl 84 HERE
Font of choice - I am using Kingthings wrote HERE
Wordart - by Rachel from enchanted by darkness
her site seems to be down so you can download it here for now
OK - open a new image in PSP 600x600 floodfill white
Copy & paste Frame3 from the kit, resize - using your selection tool set on rectangle, draw a selection around the frame, copy Paper25 and paste as a new layer, select none and drag below the frame layer drop shadow 0 0 70 5
Add a new raster layer above white background layer, select all, copy Paper3 into selection and select none, apply mask, delete and merge group
Paste Glitter1 as a new layer above the mask layer, resize slightly and sharpen
Resize blossom1 and paste as a new layer above the glitter layer, position to the side of the frame, duplicate and mirror
Copy flower6, resize and paste as a new layer on bottom corner of frame, sharpen and drop shadow, copy Butterfly1, resize and paste as a new layer on top corner
Add your tube as a new layer and drop shadow 5 5 70 9
Copy Bubble 2, resize and paste as a new layer, position under the frame so just part of it is showing, duplicate a few times and position around the frame
Open the word art and using your selection tool draw a selection around the words you want to use, copy & paste as a new layer, position on the tag where you think it looks best and colourize to suit - I colourized it by floating the words and adding a new raster layer then used the airbrush - there may be an easier way to do this!
Add your name & copyright info
delete the white background layer, resize & crop, save as a Png!

Thursday, 16 July 2009

Retro Funk

Supplies
Tube of choice - I am using a funky tube by Bam Bam which may be purchased from MPT
Scrapkit -'Retro Nights' gorgeous freebie by Dani which you can download HERE
Thank you!
Mask - Babes Mask 38 which you can grab HERE
OK - A quickie this evening
Open a new image 600x600 floodfill white
Copy Frame1 and paste as a new layer, resize & click inside the frame with magic wand, expand by 5 -copy and paste Paper 1 as a new layer, resize by 70%, selections, invert, delete and drag below frame layer, select none. Drop shadow frame 0 0 55 5
Paste your tube as a new layer and position, erase any overhang at bottom of frame
Drop shadow 5 5 70 11
Resize bow1 and paste as a new layer on Frame but below tube, sharpen & drop shadow
Copy Brads 1 and 2 - resize both by 50% paste as new layers on side of frame, sharpen & drop shadow - using loungebait font type the words inside the brads
Copy flowersticker2, resize and paste as a new layer, position in between the 2 brads
resize flowersticker5 and position on top, add noise at uniform 30
Resize the headphones and the record, position on right side, sharpen both and add a drop shadow - hide white background layer & merge visible
Resize & crop your tag
Unhide background & add a new raster layer above it, select all
Copy Paper 2 and paste into selection, select none
Apply mask, delete & merge group, duplicate & merge down
Add your name using the Murro font with Paper3 as the background fill, foreground black
add a drop shadow -2 3 67 7
Add your copyright info, delete white background layer & save as a Png!

Wednesday, 15 July 2009

Eastern Promise

Supplies
Tube of choice - I am using the artwork of Sandra Chang available from MPT
Scrapkit - 'Forbidden City' ptu kit from KatNKDA which you can purchase HERE
Thanks Kat!
Mask - otherworldfae sabremask2 HERE
Font - chinese takeaway HERE
OK - open a new image 600x600 floodfill white
Open element 8, resize and paste as a new layer
Click inside the frame with magic wand and expand by 8
Copy Paper 7 and paste as a new layer, resize by 65% and position, selections, invert, delete and drag this layer below the frame layer - now copy bg02 overlay and paste as a new layer, resize and position, hit delete again and select none
Copy element 22, resize and position down the left side of the frame, erase any overhang at the top and bottom using your eraser tool, sharpen and drop shadow
0 0 70 5
Resize element 26 and paste along the bottom of the frame, erase any bits at the sides and sharpen - copy element 18, resize and position to the right side of frame
Copy element 30, resize and position to the left side of frame, sharpen
Add your tube, resize if necessary and drop shadow 5 5 70 9
copy & paste element 17, resize and position on the tag where it looks best
Hide the white background layer and merge visible, resize by 85% and crop
unhide background layer and add a new raster layer above it, select all
copy and paste Paper 11 into selection, select none
Apply mask, delete and merge group
Open element 34 and draw around one of the signs with your selection tool set on rectangle
Copy and paste as a new layer, resize by 50% and sharpen, position to the left side of tag
Add your name and copyright info
delete the white background layer & save as a Png!

Monday, 13 July 2009

Its a Girl Thing!

Supplies
Tubes of choice - the ones I am using are from Dominic Marco available to purchase at CILM
Scrapkit - 'Thank you' freebie from Bea HERE
Thanks Bea!
Mask - butterfly mask 32 which you can find HERE
Font of choice - I am using 2peas drama queen HERE
OK - open a new image 600x600 floodfill white
Copy Paper5 and paste as a new layer, apply mask, delete and merge group
Copy frame 2 from the kit, paste as a new layer, selections, select all, float, defloat
Copy one of the blue papers from the kit and paste as a new layer, selections, invert, delete, select none and delete the original frame layer
Clic inside each of the frames with magic wand and expand by 3
add a new raster layer and floodfill with a colour from your main tube, select none
Now click in each frame one at a time, expand by 3 and paste a tube in each frame, selections, invert, delete, select none
Change the opacity of the tube layers to multiply or overlay, whichever looks best
Copy flower10, resize and paste just behind the frames, turn slightly using your raster deform tool, add a bow and some elements from the kit around the frames
Copy the ticket and paste as a new layer at bottom of frames, sharpen & drop shadow
Paste the boxes as a new layer, resize and drop shadow
Add your main tube, position and drop shadow 5 5 70 11
Add your name and copyright info
Hide the white background layer and merge visible, resize & crop
Delete the background layer and save as a Png!

Sunday, 12 July 2009

Poiseidon's Realm

I have been asked by Kat to become a CT member for her kits so I will be writing a few tutorials using her PTU kits which are totally awesome!!
Thanks Kat!
Supplies
Tube of choice - I am using a beautiful tube by KatNKDA which you can purchase HERE
Scrapkit - 'Poiseidon's Realm' ptu kit also by Kat HERE
Thanks for this gorgeous kit!
Masks - 0mask046 HERE 122kris HERE
Plugins - xero porcelain (optional)
Font of choice - I am using Al Sandra HERE
OK - Open a new image in PSP 600x600 floodfill white
add a new raster layer, select all, copy Paper11 and paste into selection, select none
Apply 122kris mask, delete and merge group
Select all, float, defloat - copy element 5 from the kit, paste as a new layer, resize and position over the mask layer, selections, invert, delete
Copy element 2, resize and position on bottom left, sharpen & drop shadow
copy and paste Poiseidon element 13, resize and position overthe shell so it looks like he is inside it - copy and paste the dolphin 15, resize and position behind the shell
Paste your tube as a new layer and position, apply xero porcelain default settings
drop shadow 5 5 65 9
Resize element 21 and paste as a new layer beneath the shell, duplicate a few times and position around the bottom of the tag
Copy and paste the seahorse 19,resize and position to the side
resize flowers 16 & 17 and position behind the mask layer to the side
Copy element 26, resize and paste as a new layer
using your selection tool set at circle, make a selection in the bottom circle and paste your tube as a new layer, position so the face is showing, selections, invert, delete
change the opacity of the tube layer to overlay or screen & merge these 2 layers visible
mirror and position on top of tag, sharpen & drop shadow
Add a new layer above white background layer and select all
Copy Paper 3 and paste into selection, select none and apply omask046, delete and merge group
add noise to this layer at uniform 40
Add your name & copyright info
resize & crop your tag, delete white background layer & save as a Png!

Saturday, 11 July 2009

Best of British

Supplies
Tube of choice - I am using the artwork of Dominic Marco available from CILM
Template- Missy template 228 HERE
Thanks Missy!
Plugins- Eye Candy gradient glow
Two Moon - Rip'n'burn
Mura Meister Copies
Mask of choice
Font of choice
OK - open the template, canvas size 650x600 floodfill the bottom layer white and delete the copyright layer
Click on the bottom circle layer, select all, float, defloat, add a new layer and floodfill blue
delete the original layer, add a gradient glow white and then again red
Click on the dash layer, select all, float, defloat, add a new layer, using your airbrush tool, colour red, delete the original layer - drop shadow both these layers 0 0 65 5
For the frames I used a selection from the dress as a pattern, select all, float, defloat, add a new layer and floodfill with the pattern - delete the original frame layers and drop shadow as above
Using the same red colour, type out the words 'Brits do it best!' or words of your choice
apply mura meisters copies, tiling default settings but change the gap to 2
Click on the right black frame layer, select all, float, defloat, selections invert
click back on the text layer and hit delete - lower the opacity slightly
Click on the left black frame layer, select all, float, defloat and paste your tube, position, selections, invert, delete, select none
click back on the black layer and apply two moon rip'n'burn angle 38 or play about with it and use whatever looks best
Paste your tube again as a new layer and position to the right
Drop shadow 5 5 70 11
Move the wordart slightly to the left, with your magic wand click inside each of the letters and floodfill alternatively with blue & red colours, select none
Drop shadow 2 3 67 7
Add your name & copyright info
add a new raster layer above the background layer and floodfill with a colour or pattern of choice
Apply mask, delete and mere group
Delete the white background layer
resixe & crop your tag to a sixe of choice
Save as a Png!

Thursday, 9 July 2009

Lotus Delight

Supplies
Tube of choice - I am using the artwork of Michael Landefeld which can be purchased from CILM
Scrapkit - 'lotus delight' beautiful freebie from KatNKDA which you can find HERE
Thank you!
Mask - Babes Mask 3 HERE
Font of choice - I am using 2peas GG mix HERE
OK - Open a new image 600x600 floodfill white
add a new raster layer and select all
Copy Paper13 and paste into selection, select none, apply mask, delete and merge group
resize by 85%, duplicate & merge down
Copy element 25, resize and paste as a new layer, sharpen
click inside each frame with magic wand and expand by 6
copy paper6 and paste as a new layer, selections, invert, delete and drag below the frames
Now paste your tube as a new layer and hit delete again, select none
Change the opacity of your tube layer to overlay
Resize the lotus leaves(35) and paste as a new layer below the frames
copy element34 resize and position below the leaves
resize element 17 and paste as a new layer, turn slightly using your raster deform tool
copy and paste element 2 as a new layer, resize and duplicate, resize the duplicate layer by 85%
copy element 32, resize and paste as a new layer on top right, sharpen more and drop shadow
0 0 65 5
Drop shadow the frames and the fan same as above
Paste your tube as a new layer above the frame layer
drop shadow 5 5 70 9
Add your name & copyright information
Duplicate the mask layer and on the bottom layer adjust blur gaussian blur 20
Delete the white background layer
resize and crop to your liking, save as a Png!

Monday, 6 July 2009

Charmed

Supplies
Tube of choice - I am using the artwork of Gretchen Raisch-Baskin which is available to purchase from UpYourArt
Scrapkit -'charming' from Fantasy Moments HERE
Thank you!
Plugins - Mura Meister copies, eye candy gradient glow
Mask- Babes mask #18 HERE
Font of choice
OK -open a new image in PSP 600x600 floodfill white
Open element 13 from the kit and paste as a new layer, resize by 30% and sharpen
Apply copies encircle with default settings - resize by 110%
Add a new raster layer above the background layer and select all
Copy paper 6 and paste into selection, select none and apply mask, delete & merge group
Use your raster deform tool to push the mask layer in at the top and bottom
Copy element 17, mirror and position on bottom left of frame, sharpen& drop shadow
0 0 70 5
Resize element 8 and position on right side of frame, sharpen & drop shadow
Add a bow of choice, resize and position on the stems
add any elements from the kit you like, I just added a dragonfly (55)
Now paste your tube as a new layer and position, resize if necessary and drop shadow
5 5 70 9
Add your name using a colour fromthe tag and apply a gradient glow
Add your copyright info, delete white background layer
Save as a Png!

Thursday, 2 July 2009

Flirt

Supplies
Tube of choice - I am using the artwork of Jessica Dougherty available from CILM
Scrapkit - 'Flirty' freebie from Adelina HERE
Thank you!
Mask - wsl 84 HERE
Xero Porcelain
Fonts 2 peas GG mix HERE
Flower3 HERE
OK -Open a new image 600x600 floodfill white
Open the brackets from P1, resize and paste as a new layer
click inside with magic wand & expand by 6, copy Paper6 from P4, resize by 20% and paste as a new layer, selections, invert, delete and move below frame layer, select none and drop shadow the frame layer 0 0 50 5
Open the notes from P3, resize and paste as a new layer below the frame, sharpen and apply same drop shadow, duplicate and rotate the bottom layer 8 degrees left, merge these 2 layers and position within the frame, copy clip 2 from P1, resize and position along top of notepaper, sharpen more and drop shadow
Copy flowers 2 from P2, resize, sharpen, drop shadow and position
Now paste your tube and erase any overhang at bottom of frame, drop shadow 5 5 70 9 and apply xero porcelain at default settings
Type the word Flirt on the notepaper using a font of choice, duplicate as many times as you want and position on paper - use 2peas GG font to add some elements to the paper
Resize Charm2 from P1, position along side of frame, sharpen& drop shadow, paste bow2 as a new layer, resize, sharpen & drop shadow, copy Jewel1 from P3, resize and position in centre of bow, sharpen more and drop shadow
Hide white background and merge visible all other layers
resize by 85% and crop
unhide white background layer and add a new raster layer above it, select all
copy Paper8, resize by 20% and paste into selection, select none and apply mask
delete and merge group
Resize one of the doodles and paste above the mask layer, sharpen & drop shadow
Now add your name & copyright info
delete the white background and save as a Png!